Vascular cannulation is common practice in critical care, and is traditionally performed using the landmark technique – though failures and complications are not uncommon. In this regard, ultrasound guided vascular cannulation (USGVC) has been shown to improve the procedure success rate and reduce its associated complications. This review addresses the fundamental aspects of USGVC and discusses some training issues related to this technique which is currently regarded as essential for intensivists.
La canulación vascular es una práctica común en cuidados críticos. Este procedimiento se realiza clásicamente siguiendo referencias anatómicas, siendo comunes los fallos y complicaciones relacionadas al mismo. Al respecto, la canulación vascular eco-dirigida (CVED) ha demostrado mejorar el rédito del procedimiento y reducir las complicaciones asociadas al mismo. Esta revisión trata sobre los elementos fundamentales de la CVED, como también menciona algunos aspectos del entrenamiento en esta competencia considerada hoy día fundamental para los intensivistas.
Venous and arterial cannulations are common and necessary practices in critically-ill patients worldwide. Although vascular accesses are usually obtained using the anatomical landmark technique, this practice is not exempt from failures and complications. In this respect, ultrasound-guided vascular cannulation has been shown to improve first pass success, reduce the number of attempts, improve patient's satisfaction and reduce overall procedure-related complications. Therefore, this method is increasingly used as a first choice to obtain tool to obtain a secure vascular access in critical care patients.1–5
The proposal of this review is to summarize and simplify the fundamental sonographic aspects at the moment of deciding and executing an ultrasound-guided vascular access, and it also intends to highlight some aspects related to the optimal training for this practice.
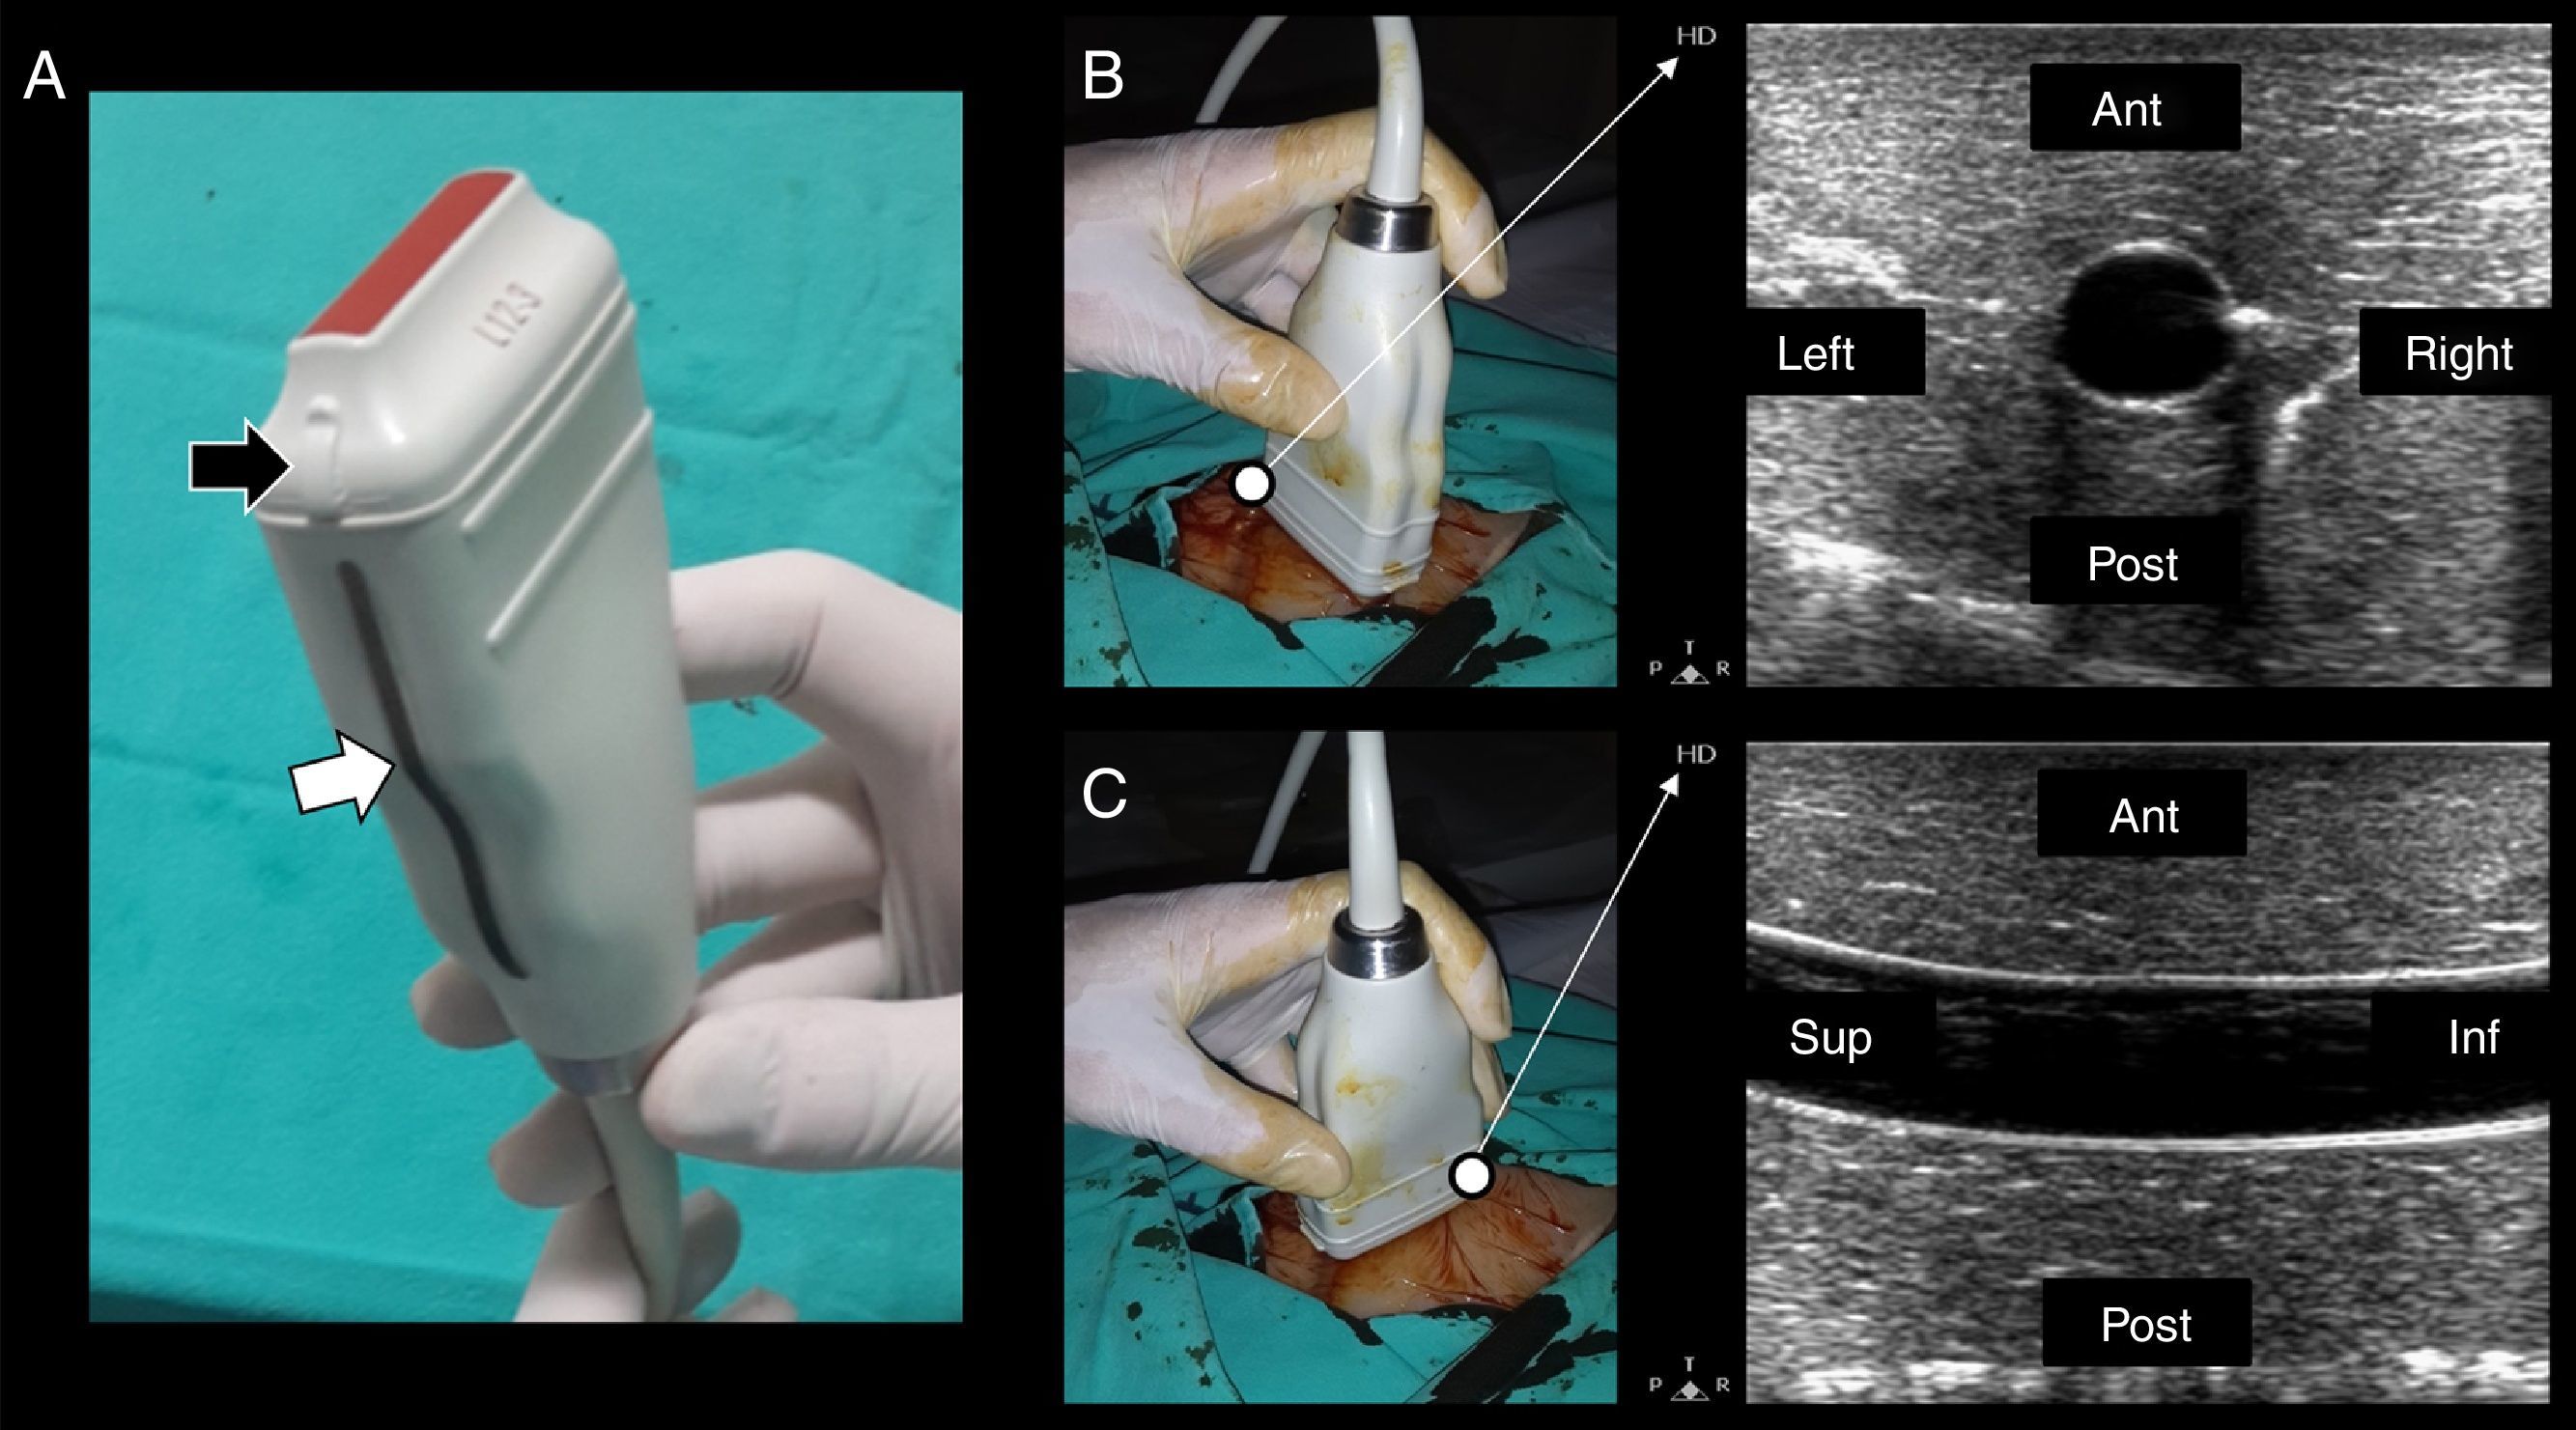
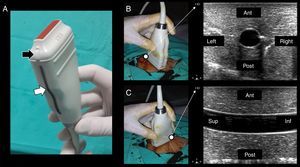
Technique and ultrasonographic vascular anatomySince vascular structures are superficial, a linear array transducer (7–10MHz) (Fig. 1A) is commonly used to recognize the vessels, with the selection of a preset corresponding to veins or arteries, as the case may be.
(A) Lineal transducer. The transducer indicator is in this case represented by a salient (black arrow) and a dark-gray line (white arrow). This indicator demarcates the beam leading edge that corresponds to a mark on the screen (in this machine, “HD” in B and C). (B) In the short axis, the probe indicator is pointing toward the operator's left side, matching the left side of the ultrasound machine screen. In this axis, the vessels are shown round (arteries) or oval (veins). (C) Starting from the short axis, the transducer is rotated 90 degrees clockwise, thus obtaining the vessel long axis. The probe indicator is located furthest from the operator (Sup.) and matching, again, the screen left side. In this axis, the vessels appear tubular. Ant.: anterior; Post.: posterior; Sup.: extreme of the transducer furthest from the operator; Inf.: extreme of the transducer close to the operator.
Two-dimensional imaging is primarily used, both in the short and long axis of the vessels. In some circumstances, color and spectral Doppler can be required.1,2,6,7 Three-dimensional ultrasound, although an interesting technique, is scarcely used and is not actually recommended in practice for vascular cannulation.1
In terms of orientation, the probe indicator is pointed toward the operator's left side for short-axis views; to obtain long-axis views, the probe is rotated 90° clockwise from the latter position. In this way, the left side of the screen matches the operator's left side in short-axis views, while it matches the probe end located furthest from the operator in long-axis views (Fig. 1B and C).
Regarding transducer manipulation, resting the medial edge and/or the transducer operator's fingers on the patient is the best way to prevent the transducer from unintentionally slipping; on the contrary, vague hand positions will predispose to fatigue and unintentional transducer movement.8
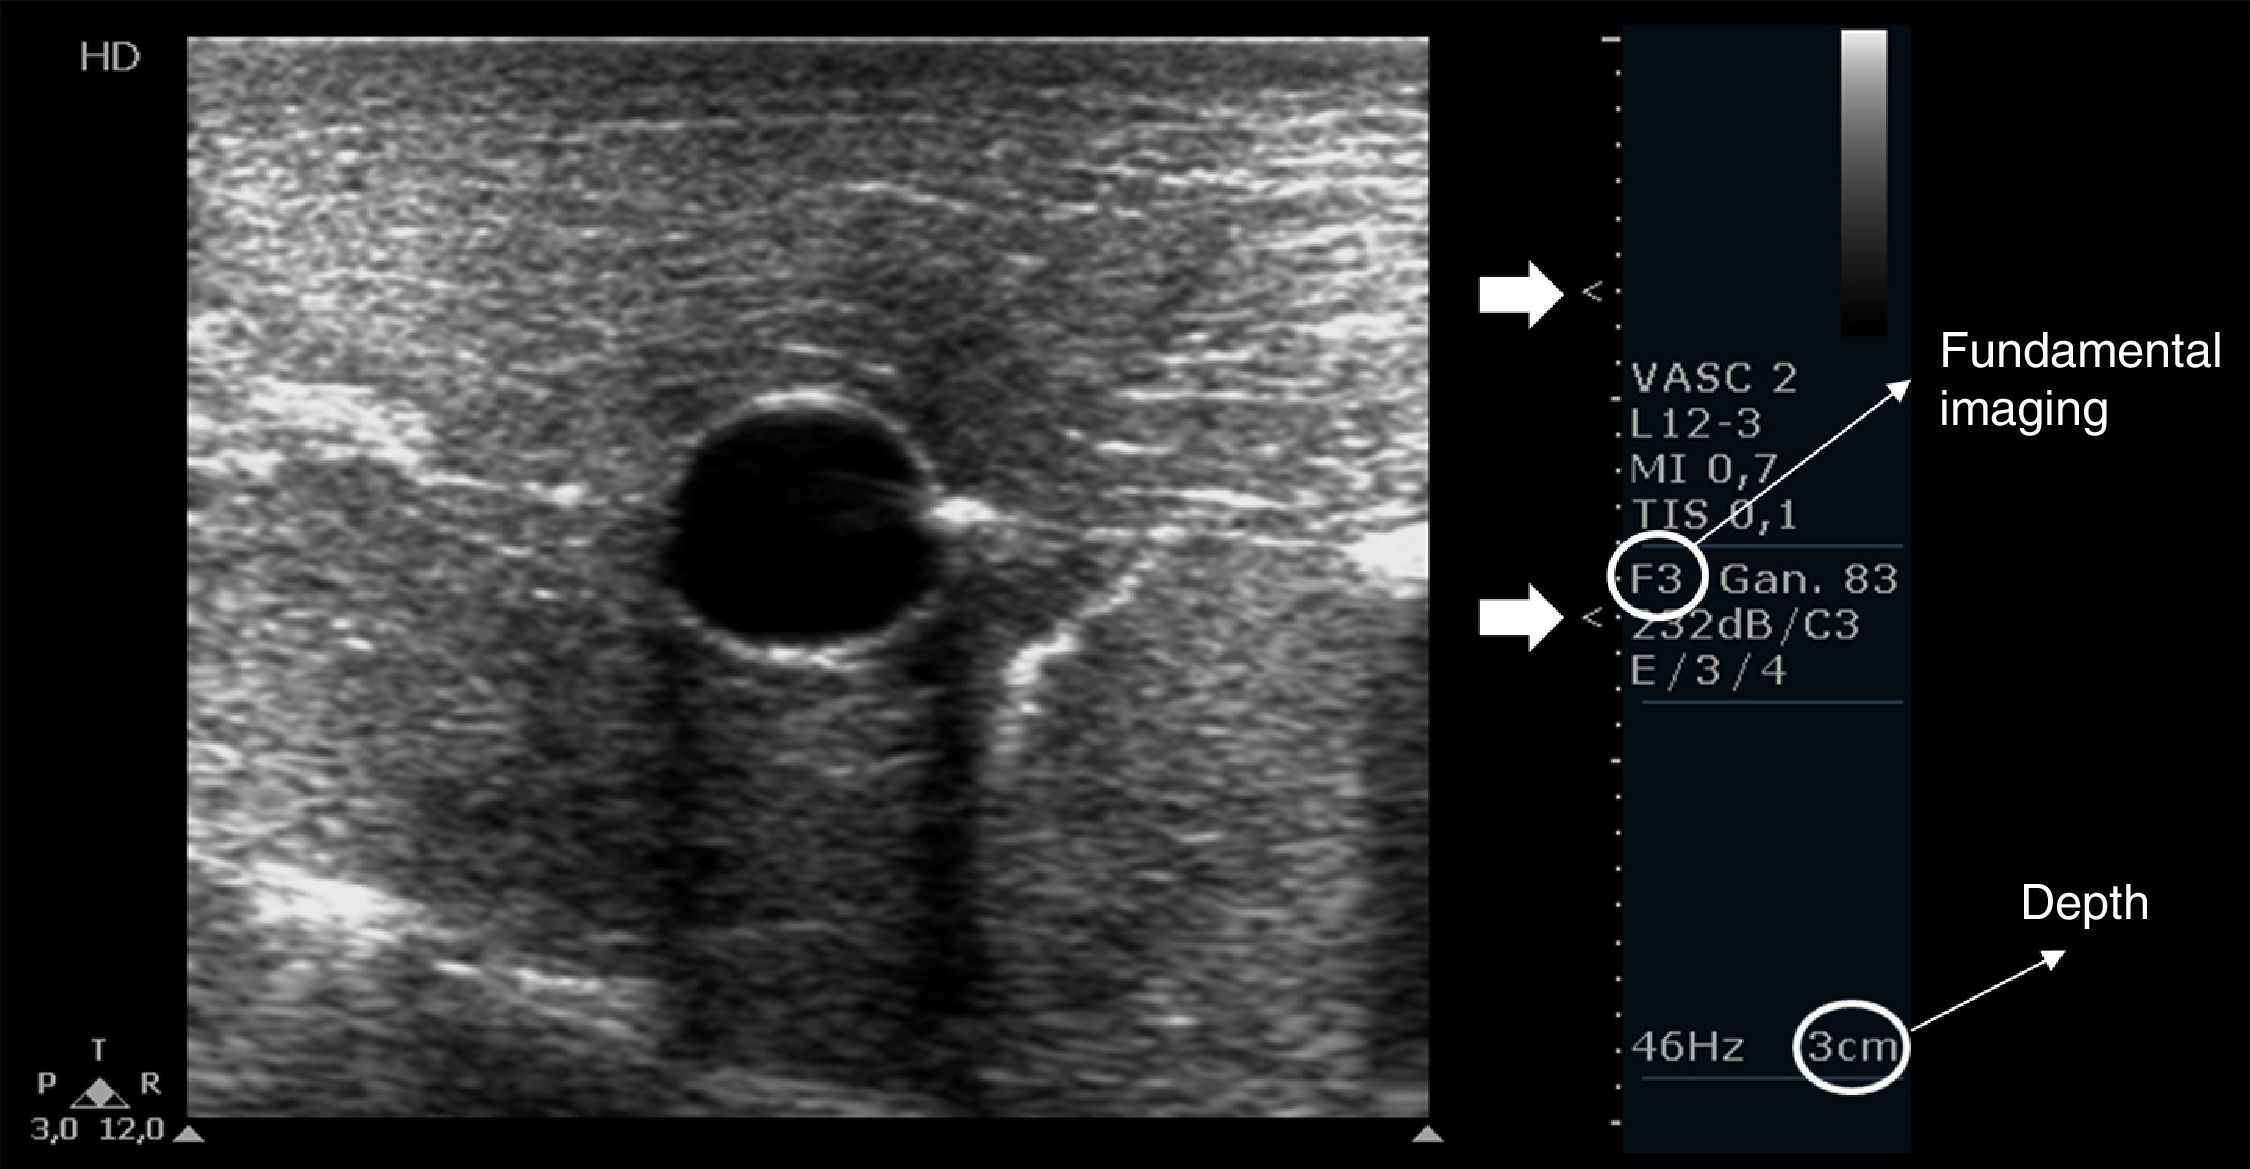
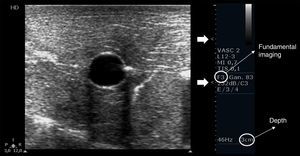
Depth, gain and focal zones are the most important machine parameters that practitioners always need to optimize to carry out the best possible evaluation on the vessels. Preferably, tissue harmonic imaging must be switched off, especially for further needle recognition8 (see below) (Fig. 2).
Proper basic technical parameters to optimize the image for vascular cannulation. The focus zones, which are two in this case (arrows), are positioned in superficial tissues and in line with the vessel, so as to improve resolution in these regions, thus best delineating the vessel and its surrounding structures and further recognizing the needle and its insertion in the vessel. Depth must be adjusted involving the vessel posterior wall and the structures behind it, in order to select or discard a vessel for cannulation (e.g. artery over vein overlapping) and to readily detect an inadvertent puncture of the vessel posterior wall. Proper gain adjustment (general gains and near-far field gains using the time-gain compensation controls) are essential: too high gains can mask the echogenicity of the needle between the tissues, while too low gains may obscure the echogenicity of the needle as well as the vessel. Finally, using fundamental imaging is advocated, since tissue harmonic imaging is associated with poorer needle recognition.
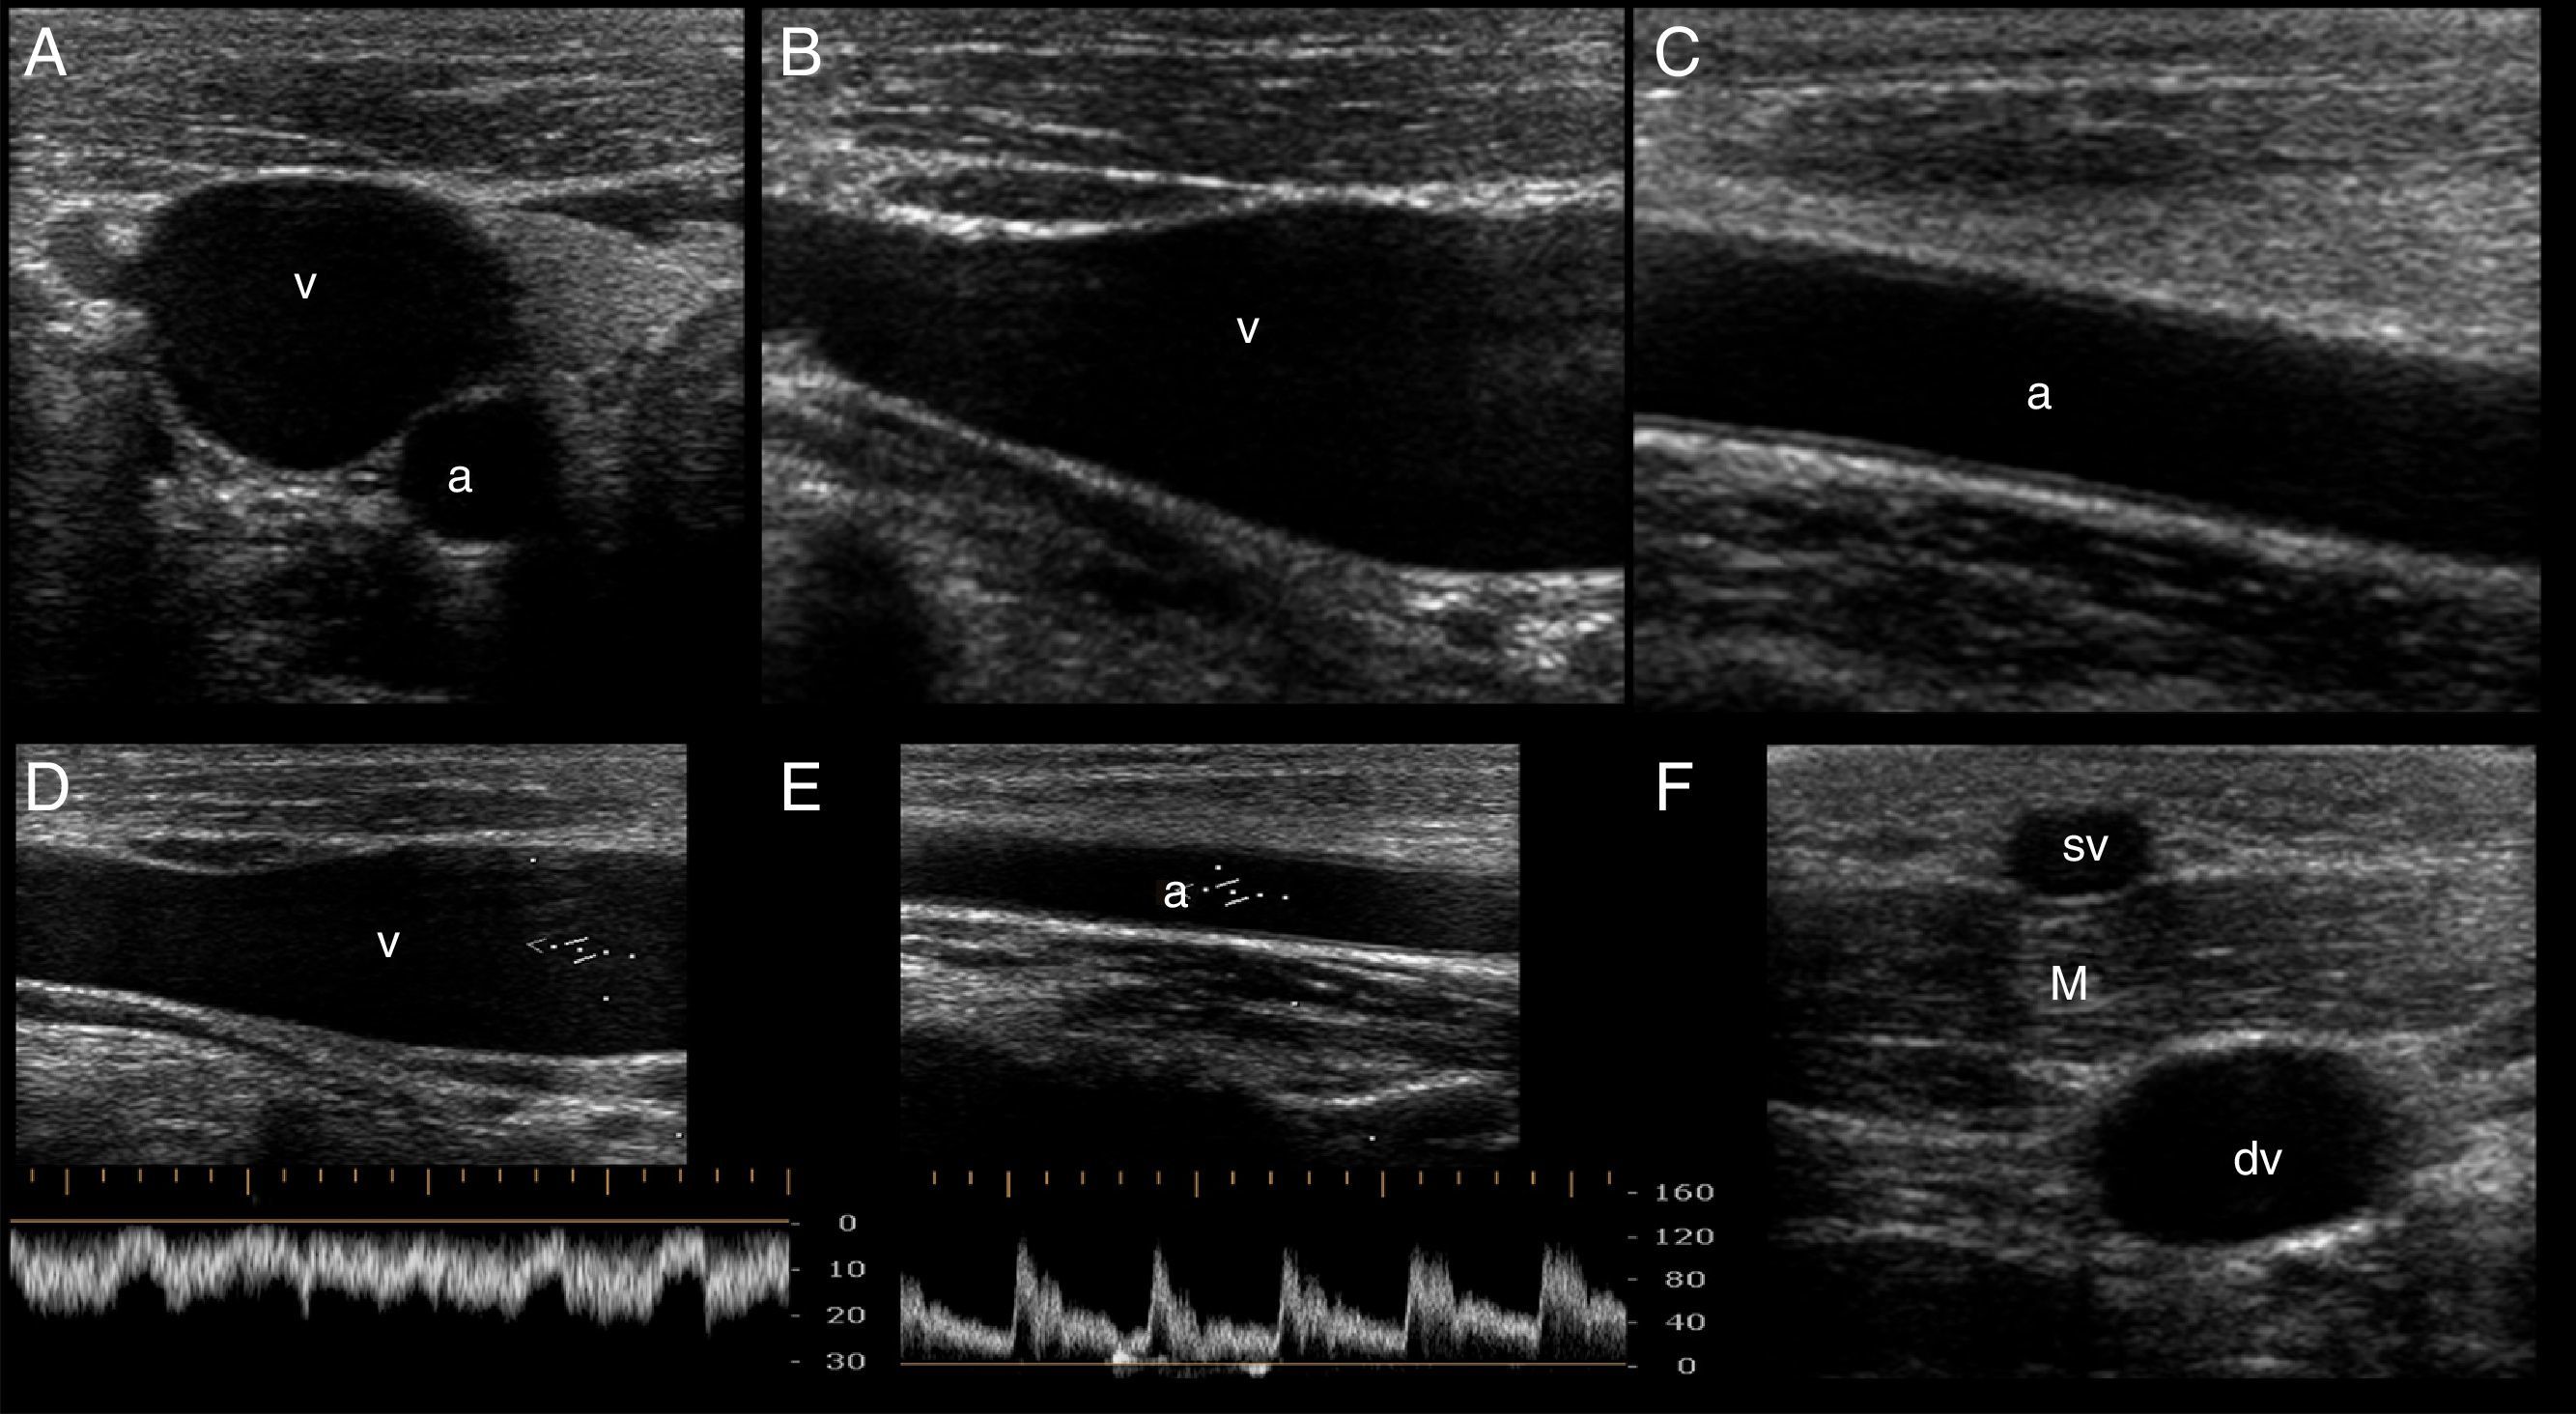
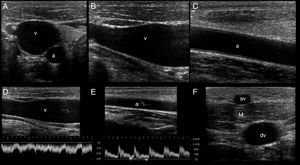
In the short axis, the veins are more oval than round, have an anechoic content, their walls are thin, they are fully compressible and, lastly, they are not pulsatile. On the contrary, the arteries are round, also have an anechoic content, have a thicker wall in comparison with veins, are poorly compressible and, lastly, they have pulsatility2,7 (Fig. 3A).
Ultrasonographic (US) appearance of the vessels. (A) Vessels in short axis, v: vein; a: artery; (B) vein (v) in long axis; (C) artery (a) in long axis; (D) vein flow demonstrating phasicity at spectral Doppler; (E) arterial flow demonstrating pulsatility at spectral Doppler; (F) differences between a superficial vein (sv, above deep fascia and muscle) and a deep vein (dv).
In the long axis, the vessels appear tubular (Fig. 3B and C). Valves can sometimes be observed in the veins, with the corresponding normal opening and closing movements. Arteries lack valves. In some cases, when a proximal tourniquet is applied in the veins, stagnant blood, also called rouleaux, can be observed as internal mobile echoes within the vein, fully cleared when compressed with the transducer.
Using color and spectral Doppler, veins normally have a phasic flow (Fig. 3D) (having augmentation with distal compression), whereas arterial flow is pulsatile (Fig. 3E).
Superficial veins are found above the deep fascia and muscle, and they are not accompanied by arteries. On the contrary, deep veins are located below the deep fascia and are always accompanied by arteries (and nerves) in the neurovascular bundle (Fig. 3F).
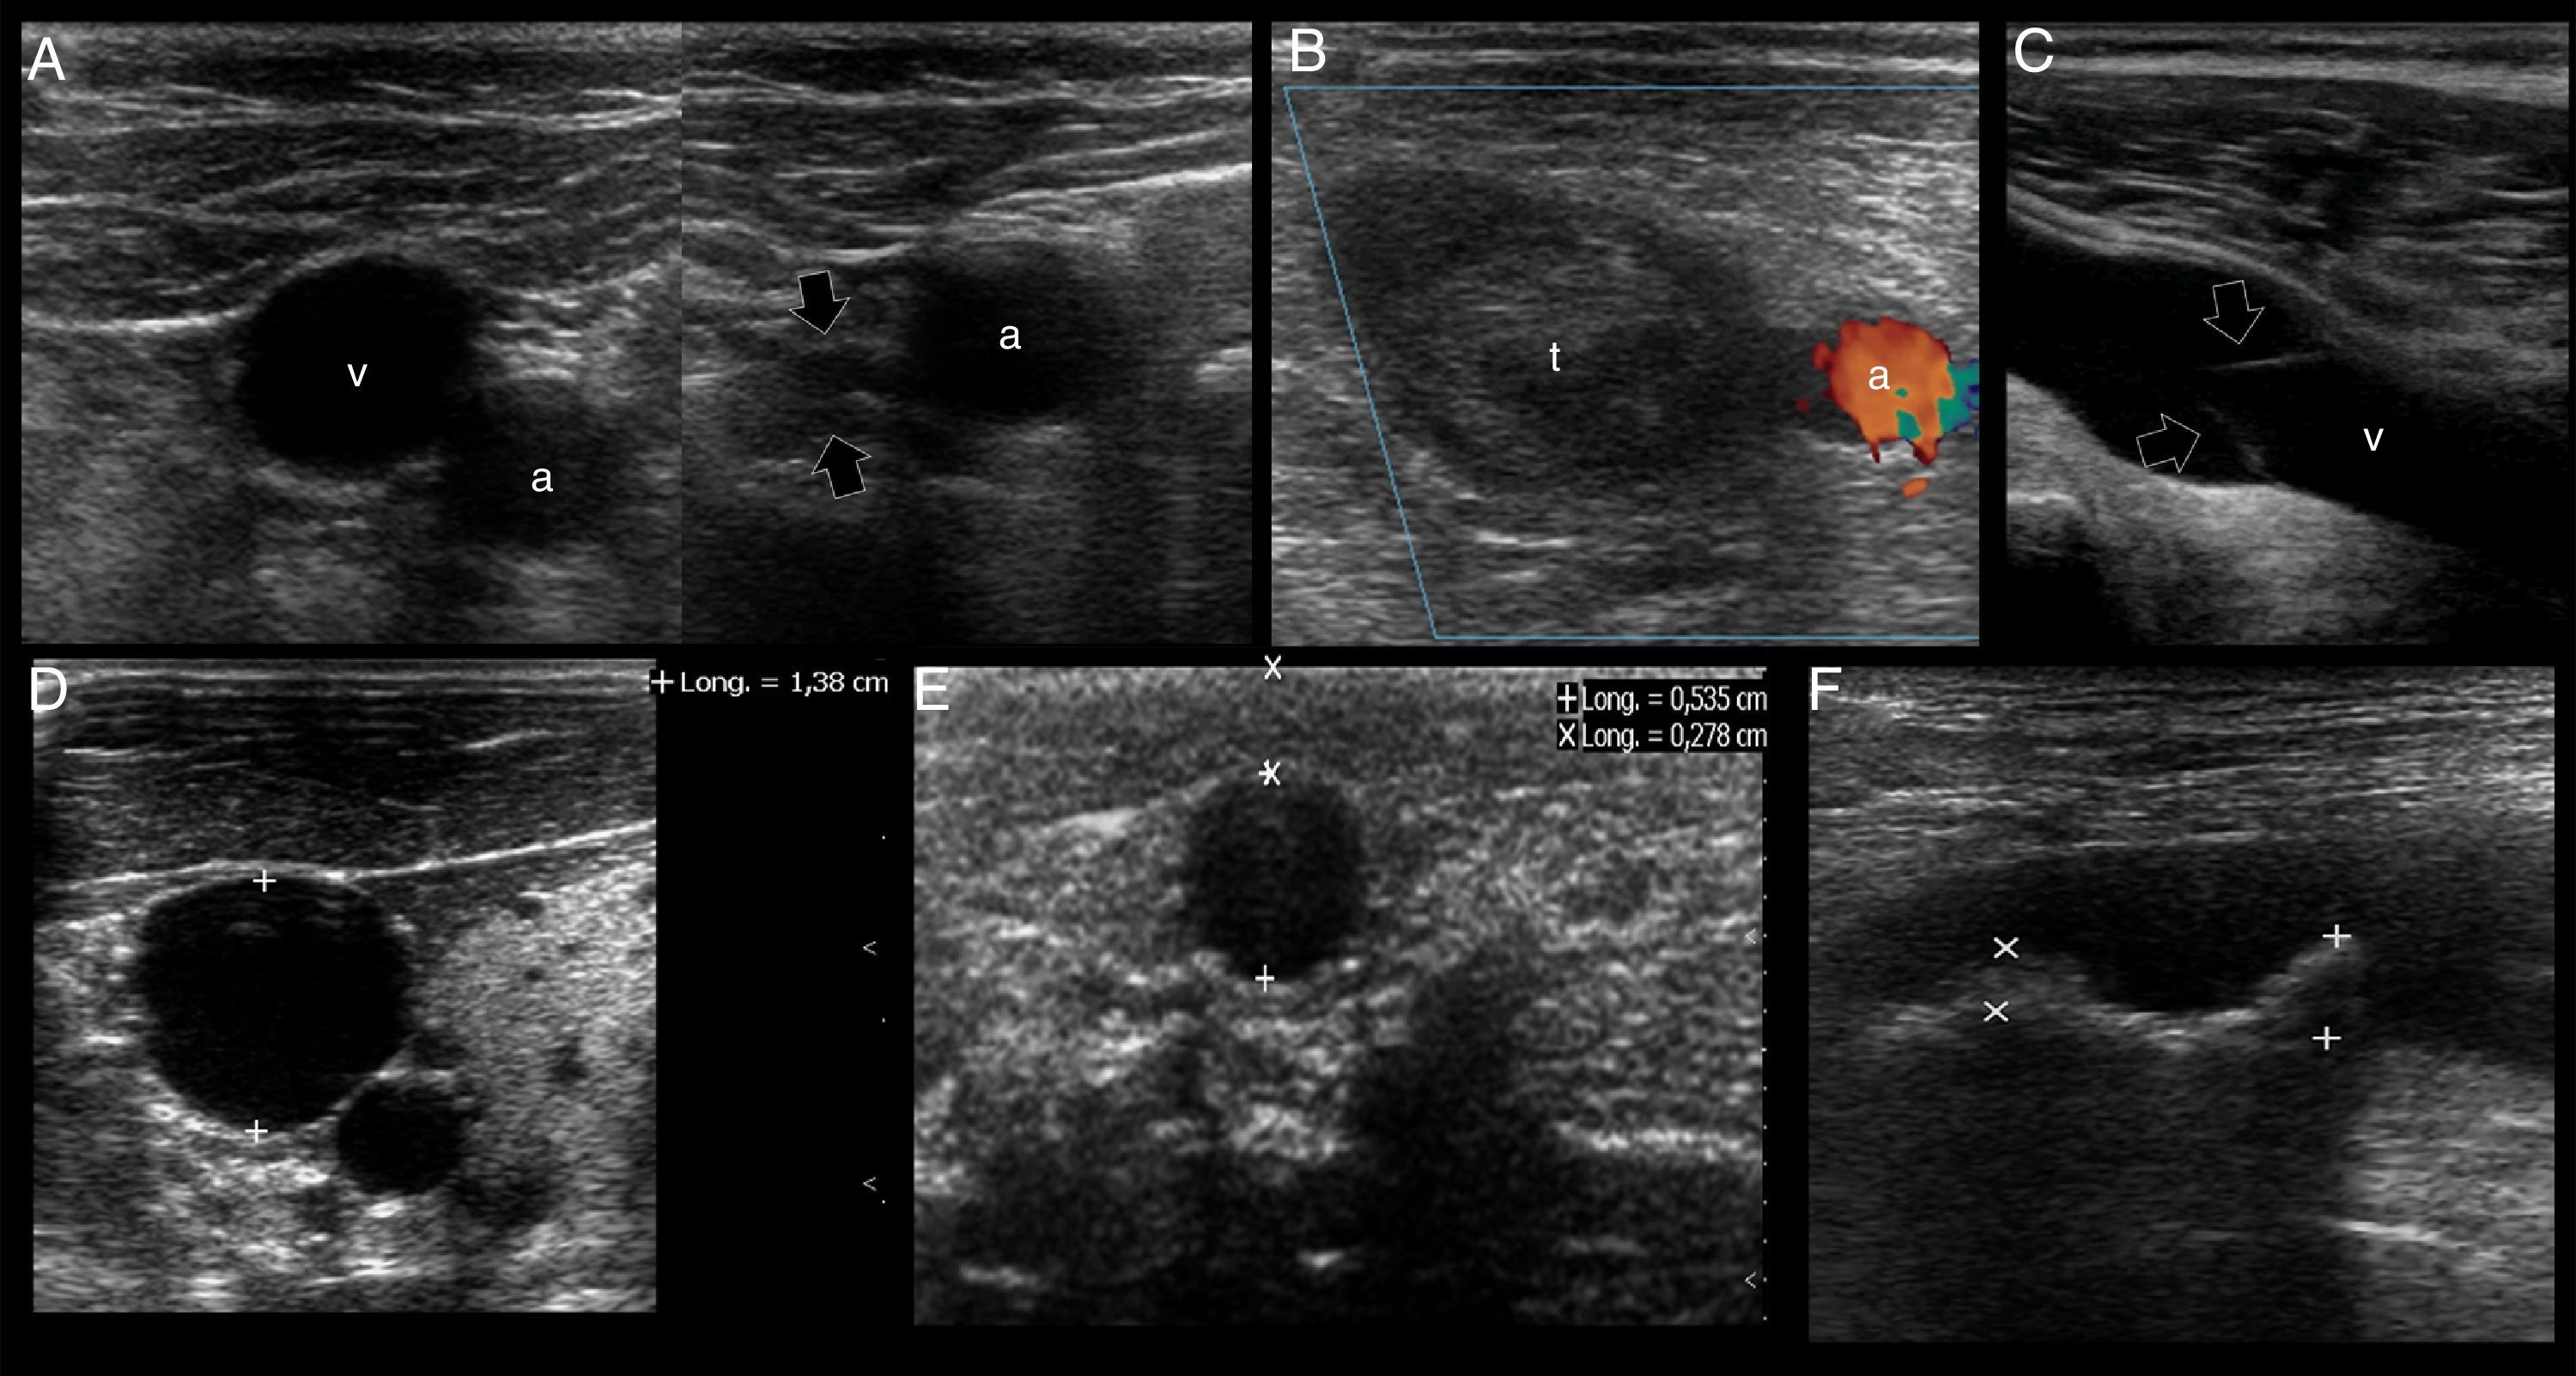
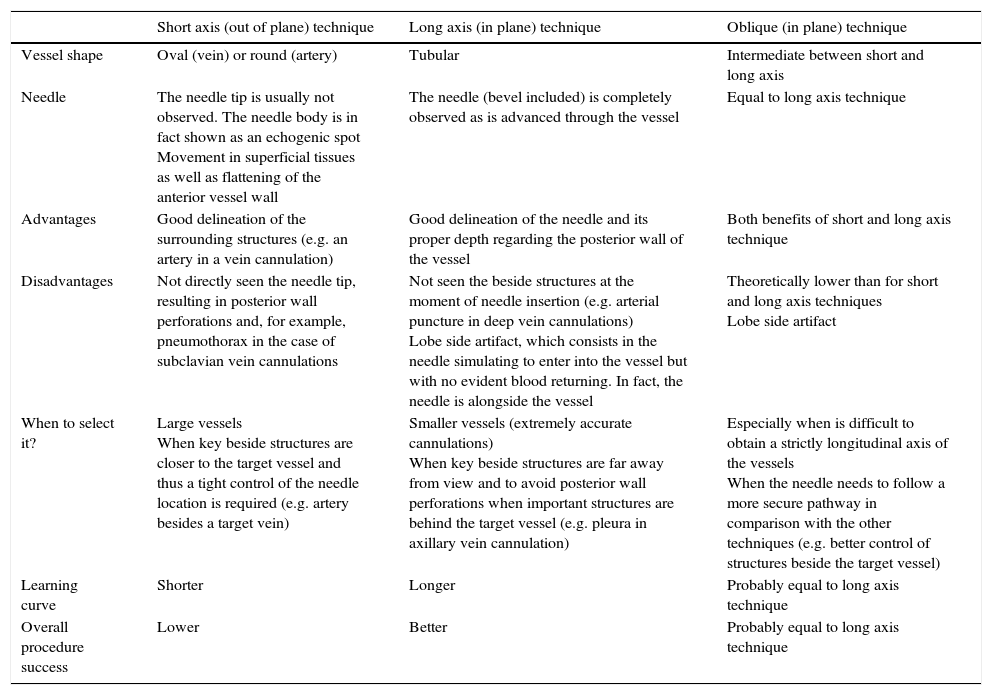
Ultrasound mapping before cannulationAfter recognizing the vascular structures, the next step is selecting an adequate vessel to be successfully cannulated (Table 1 and Fig. 4).
Ultrasonographic criteria for an optimal selection of a target vessel.
| • As superficial as possible |
| • Guaranteeing a safe pathway (far away from key structures, such as the pleura) |
| • Patent vessels (rule out a thrombosed vein or artery) |
| • Absence of atheromatous plaques in the selected site (arteries) |
| • Absence of valves in the selected site (veins) |
| • Central veins: anteroposterior diameter≥7mm |
| • Peripheral veins: anteroposterior diameter≥4mm; skin to vessel distance: <=16mm (longer catheters 8–20cm can still be used if the vessel has an appropriate size but the skin to vessel distance is >16mm) |
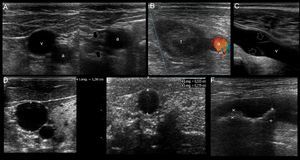
US mapping before cannulation. (A) Patent vein, confirmed by full compressibility (arrows); (B) thrombosed common femoral vein, clearly seen enlarged and occupied by a large thrombus (t); a: common femoral artery. (C) vein valve; v: vein; (D) optimal vein diameter for central venous cannulation; (E) optimal vein diameter and distance from skin to vein for peripheral vein cannulation; (F) artery with two calcified atheromatous plaques (calipers).
In all cases, the selected vessel must be permeable, must be as superficial as possible, and have a secure pathway regarding the predicted travel of the needle, avoiding possible damage of key structures.2,7
As for vein assessment, some aspects must be taken into account:
First, the patency of the vein must be demonstrated along its course applying anteroposterior compression forces in short axis views. Normally, a patent vein is fully compressible (Fig. 4A). A vein having a thrombus is not compressible or is partial compressible and thus it is discarded for cannulation (Fig. 4B).
Secondly, vein valves (Fig. 4C) must also be avoided when selecting the site of cannulation, since this may make the catheter passage difficult as well as damaging the vessel and predisposing it to thrombosis.2,7
Thirdly, the veins must have a normal diameter to be successfully cannulated. For central veins, an optimal anteroposterior diameter≥7mm is recommended2; for peripheral veins≥4mm4 (Fig. 4D and E).
In peripheral vein cannulation, the selected vein must be superficial by definition, thus avoiding any possibility to injure an artery. An optimal distance from skin to the vessel <16mm is important to avoid the premature dislodgement of the catheter3,4 (Fig. 4E). In other cases, a longer catheter (e.g. 8–20cm, “midline catheters”) can be used if the vein is more deeply located but still has an optimal dimension.9 The latter is commonly seen in the basilic vein of the arms. Furthermore, a peripherally inserted central catheter (PICC) can be inserted in these veins.7
When selecting arteries, permeability is assessed observing the normal luminal anechoic content as well as the vessel pulsatility in real time. Color and spectral Doppler can be used but are seldom required for this purpose. It is important that the arterial wall does not contain an atheromatous plaque in the future site of puncture, since this may lead to plaque accident and a thromboembolic complication (Fig. 4F). As opposed to veins, there is no optimal recommended artery diameter for cannulation.
Ultrasound-guided vascular cannulation: the procedure itselfStatic vs real-time techniquesOnce a target vessel is selected, cannulation can be executed using an static technique (US-guided vascular location and skin marking but without using real-time US guidance) (Video 1) or using a dynamic or real-time technique, consisting in observing the screen for direct or indirect signs of the needle entering into the vessel.2,7 (Videos 2, 3 and 4). Both US techniques are more successful for cannulation in comparison with the landmark technique.2,7 When comparing the static and dynamic techniques, the latter has demonstrated a better performance for vascular cannulation compared to the former.2,7 Advantages of the static technique is that it does not require sterile covers for the probe or a needle-screen coordination by the operators. On the other hand, in the real-time technique, cable and probe protection (as well as using sterile US gel) is needed to maintain a sterile technique, the latter usually resulting in some loss of resolution. Additionally, dynamic techniques require a perfect coordination between needle insertion, screen observation and the evaluation of blood returning from the needle, skills that necessarily require proper training and learning curve.
Real-time techniquesFor US-guided real-time vascular cannulation, there are two main ways to reach the vessel: short axis and long axis1,2,7 (Video 2 and 3). There is a hybrid approach between the two techniques mentioned above called the “oblique” technique1,10 (Video 4).
Dynamic techniques can be performed by one operator (freehand technique, one operator simultaneously manipulates the probe and the needle) or two operators (one person manipulates the probe and the other person performs the procedure) and there is no formal recommendation regarding the selection of one approach over the other; however, although it requires more expertise, the freehand technique is preferred by most advanced practitioners, as it allows for real-time hand-eye coordination and it does not require additional staffing.7 While commercial needle guides are available for vascular guidance, most experienced users find that they are cumbersome and do not add value to a freehand technique. 7
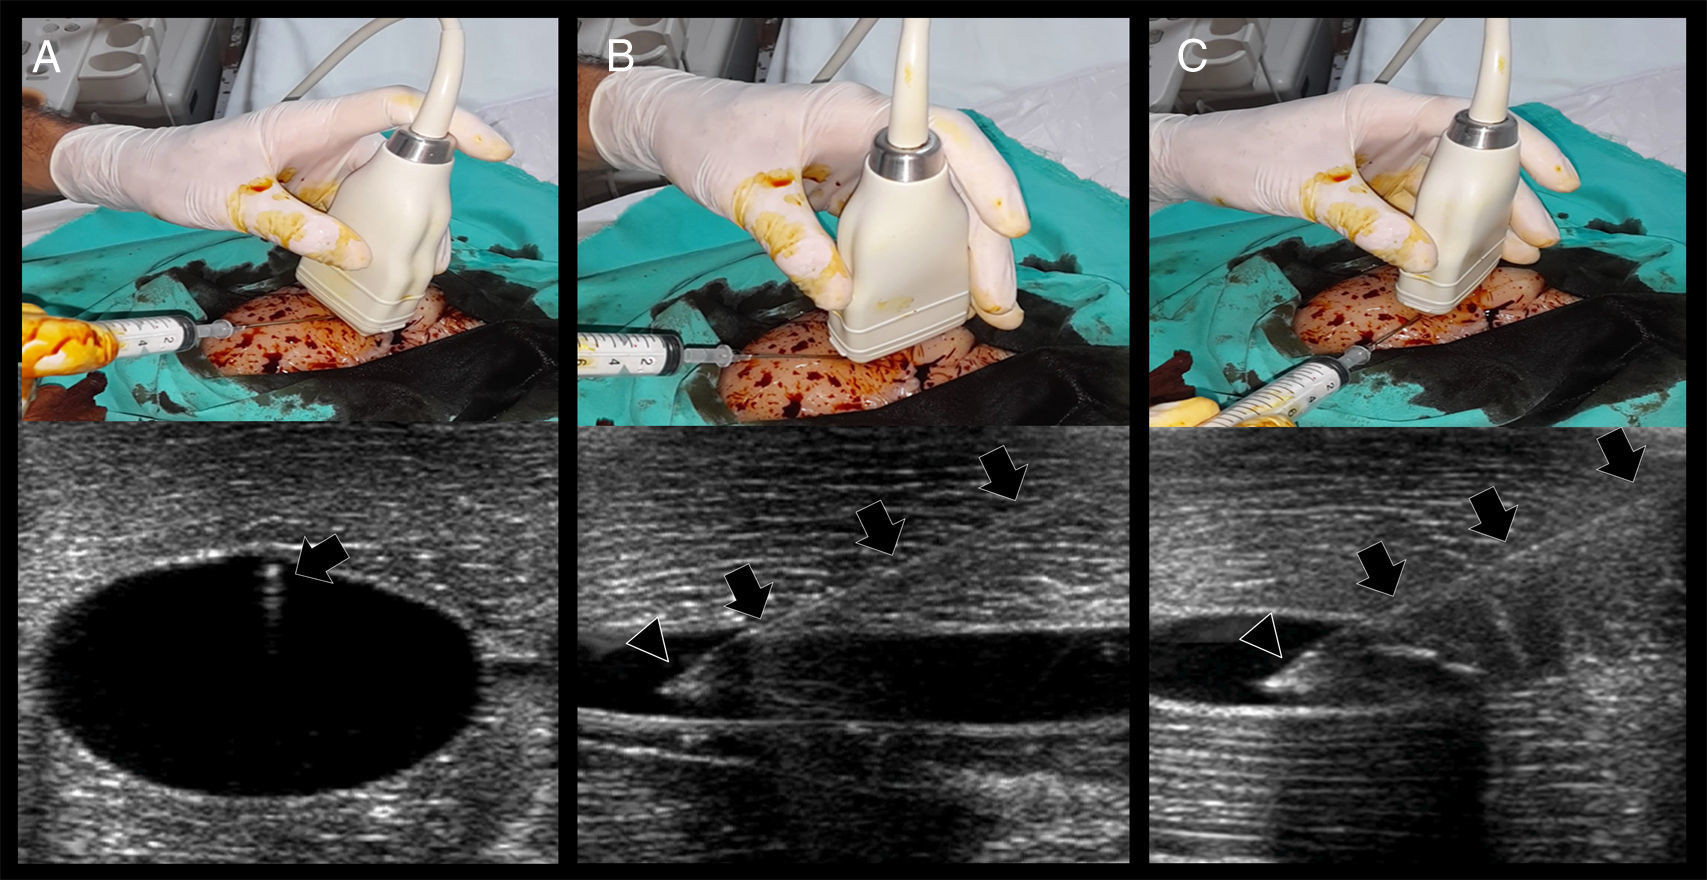
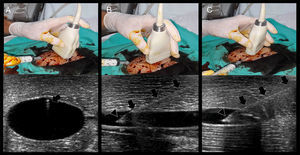
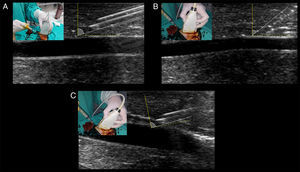
In short axis cannulation, the vessel is centered on the screen and the needle is inserted in the middle, as close to the transducer as possible, and is advanced intersecting the ultrasound beam as shallow as possible to enhance needle visualization (see below). Since the tip of the needle commonly exceeds the body of the transducer as is inserted, observing the needle tip is difficult; in fact, the body of the needle (or its derived reverberation artifacts) is the portion seen7,11 (Fig. 5A). This explains why this technique is usually considered an “out of plane” technique. When using this approach, indirect signs of cannulation are important, such as the movement of the superficial tissues and the flattening of the anterior vessel wall as the needle is advanced into the vessel.
Real-time US-guided vascular cannulation. (A) Short axis (out of plane) technique. Arrows: needle and its reverberation artifact; (B) long axis (in plane) technique. Arrows: needle body, Arrowhead: needle bevel; (C) oblique (in plane) technique. Arrows: needle body; arrowhead: needle bevel.
In the long axis technique, the needle follows the path of the transducer and the ultrasound beam; therefore, it is completely visualized, including the bevel, advancing from the superficial tissues (using the ski lift technique and a shallow insertion angle, see below) up to its definite position into the vessel7,8,11,12 (Fig. 5B). This is why this technique is commonly considered an “in plane” technique. Using the probe orientation mentioned above, the needle is observed as is advanced from the right side of the screen; however, individual practitioners may prefer to see the needle from the other side (this can be achieved by changing the probe orientation or simply inverting the indicator probe positioning in the screen without changing the probe orientation).
Using the oblique technique, the needle is usually advanced using an “in plane” approach10 (Fig. 5C).
While “out of plane” and “in plane” are usually known as synonyms of short and long axis techniques, respectively, in fact they strictly refer to needle insertion in relation to the probe and ultrasound bundle, not in relation to the short or long axis of the vessels. Thus, “out of plane” and “in plane” approaches can be obtained in short and long axis approaches.
Improving needle visualizationNeedle visualization is sometimes cumbersome and practitioners must be aware of several useful ways to readily improve needle recognition (Table 2).
Tips to improve needle visualization.
| • Proper adjustments of the depth, gain and focus zones |
| • Fundamental imaging (harmonic imaging switched off) |
| • Secure transducer hand positioning |
| • Check for a correct alignment between the probe and the needle, and preferably move the probe instead of the needle when the latter is not seen (avoid moving the needle and the probe at the same time) |
| • Needle bevel facing up or facing down, but not medial positions |
| • Ski lift technique for best recognizing the needle in superficial tissues (in plane techniques) |
| • Optimal needle-beam angles (closer to 90 degrees, especially important for in-plane techniques) |
| • Electronic beam steering as well as “heel-toe” technique in sloped insertions (<55 degrees) |
| • Wire-in needle technique (in plane techniques) |
| • Walkdown technique (out-of-plane technique) |
As previously mentioned, proper adjustments of gain depth and, especially, focus zone positioning parameters are basic and essential US machine manipulations intended to enhance resolution of superficial tissues aiding in needle recognition. Fundamental imaging is preferred over tissue harmonic imaging (THI), since a better needle visualization is observed when THI function is switched off.8
Either facing up or facing down bevel positioning are best to visualize the needle tip, in contrast with mid bevel positions.8
The first step to troubleshooting a “disappearing” needle is to visually inspect needle and transducer positions and exclude gross misalignment. The transducer should then be moved in a slow and controlled manner using sliding, tilting, and rotating maneuvers until the needle shaft and tip have been brought back into view.8 It is best to avoid moving the transducer and needle at the same time when trying to align them, as this makes the task more difficult and increases the risk of unintentional needle trauma.8
A common practical problem is the needle tip recognition in the superficial tissues as is inserted in the middle of the side of the transducer using in-plane techniques (long axis or oblique approaches). This situation may preclude the optimal visualization of the entire needle as is advanced and is seen when the needle is inserted too far away from the transducer. One way to best recognize the needle in these cases is to use the “ski lift” technique12 (Video 5), which consists in slightly elevating an extreme of the transducer, then inserting the needle below it and finally allowing the transducer to lean over the needle; in this way, the needle is always insonated and thus best recognized.
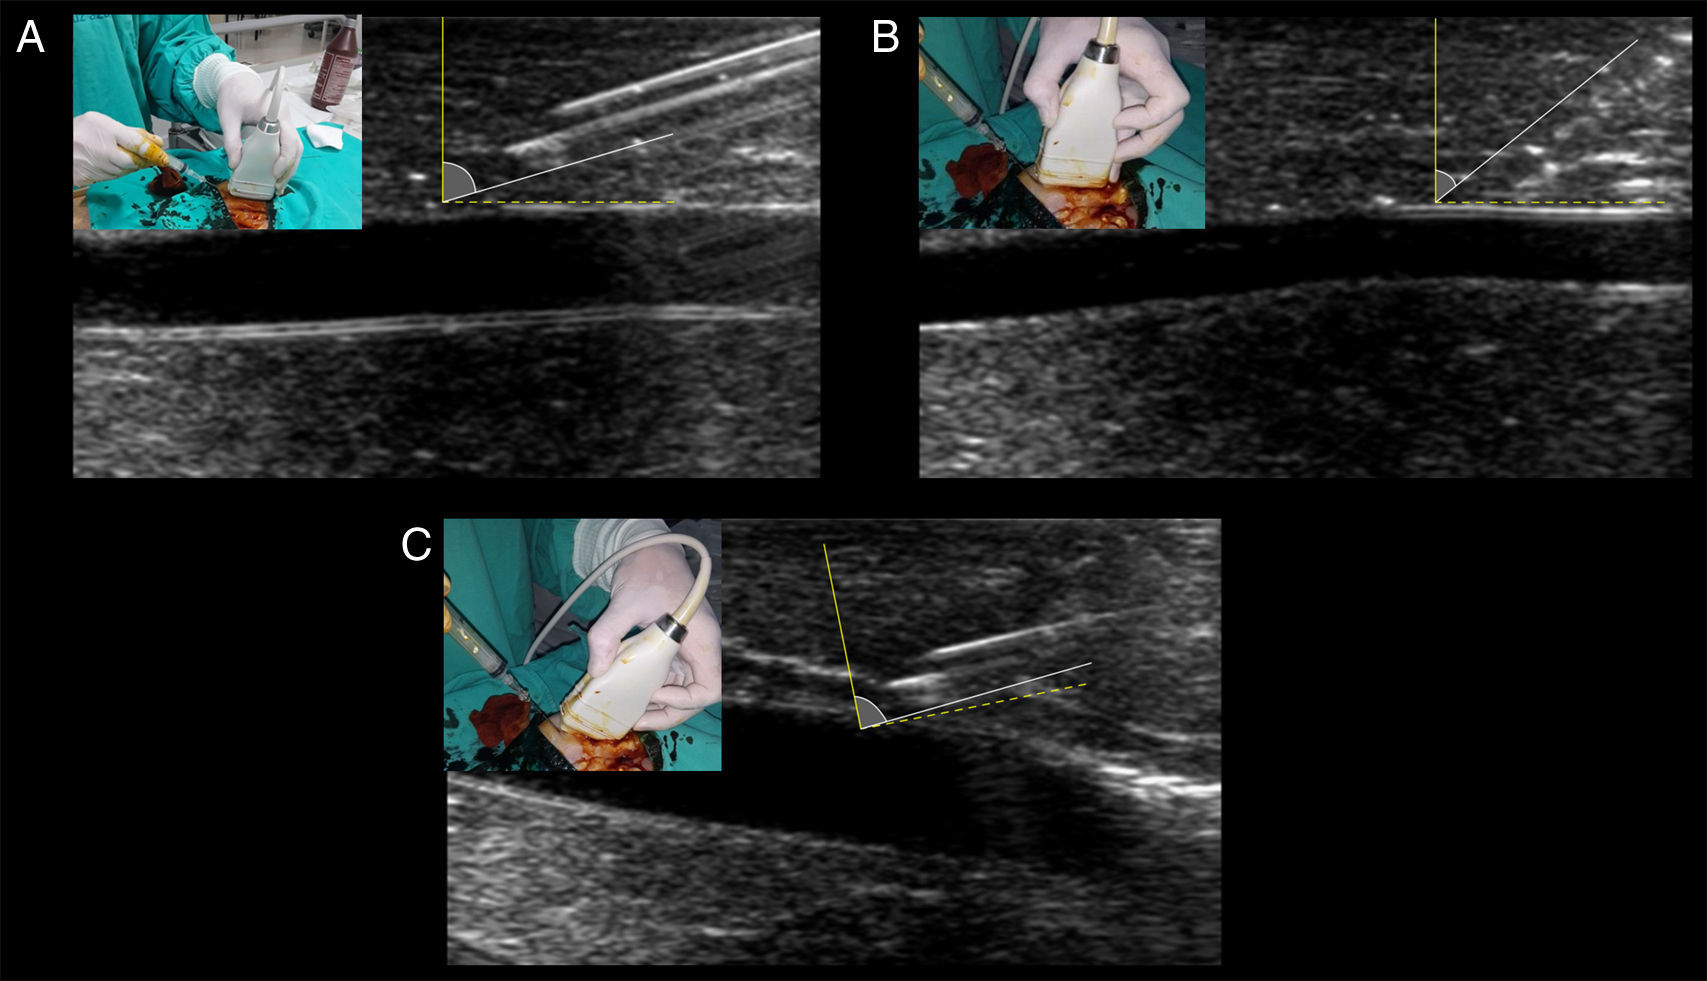
The most important tip for needle recognition using “in plane” techniques is the angle of insertion with respect to the ultrasound beam (needle-beam angle).8 Angle insertion close to 90 degrees is the best angle for needle visualization, according to ultrasound physics (i.e. specular reflection) (Fig. 6A). When using sloped angles of insertion (<55 degrees), the needle is not well visualized (Fig. 6B) thus, a shallow needle-beam angle must be kept to improve needle recognition at all times. In cases of unavoidable sloped angles of needle insertion (e.g. vessels that are too deep), using the electronic beam steering function of the ultrasound machine can enhance the needle visualization secondary to increasing the needle-beam angle toward 90 degrees. Using the same principle of needle-beam angle “correction”, instead of electronic beam steering, the “heel-toe” technique is also a valid alternative for this purpose (Fig. 6C).7
Optimal needle-beam angle for best needle recognition. Dotted yellow line represents the 90 degrees in relation with the beam, illustrated by the solid yellow line. Solid white line represents the needle and its angle in relation with the beam. (A) Shallow needle-beam angle of insertion, allowing for perfect observation of the needle body and the bevel (facing up). Needle reverberation artifacts are also evident. (B) A slopped angle of insertion is shown, and needle visualization is blurred between the tissues. (C) With the needle in the angulation of B, inclining the transducer (“heel-toe” maneuver) greatly enhances needle visualization through approaching the need-beam angle toward 90 degrees.
In short-axis cannulations, one way to improve the needle tip visualization is to “fan” the transducer proximally as the needle is advanced7 (walkdown technique) (Video 2).
Another way to improve needle visualization is the use of echogenic needle designs (“echo-enhanced needles”, obtained by needle dimpling, etching, and polymer coating). Although using these needles did not appear to improve important metrics such as first-pass success or number of attempts, they proved to enhance needle tip recognition and decrease the number of posterior wall perforations.13 Its main disadvantage is its high cost.
Using needle-enhancing software allows the improvement of needle visualization; however, there is not enough evidence to suggest using it.
An interesting approach to enhance needle recognition is the “WIN” technique, an acronym that stands for “wire-in needle “modified Seldinger technique14 (Video 6). It consists in the needle insertion with the wire mounted inside it (needle filled by the wire up to the bevel), with the purpose of enhancing the needle echogenicity as its hollow part (normally occupied by air or eventually primed by fluids) is occupied with metallic material. In addition to enhancing the needle, this technique provides a “one-in-all” approach, since the operator does not need to disconnect the syringe and then pass the wire; on the contrary, they insert the wire immediately after needle insertion into the vessel. This is especially important when cannulating depleted vessels since the needle tip is commonly dislodged from the target vessel when disconnecting the syringe from the needle in traditional Seldinger technique.14
Color Doppler does not aid in needle recognition and thus its use is neither useful nor recommended.
As previously mentioned, three-dimensional US, observing the needle and vessels in the three planes of the space, is an interesting technique that can improve precision when locating the needle; however, volumetric transducers are not widely available and the use of the technique is neither systemized nor widespread. Thus, although promising, three-dimensional US for vascular cannulation is not yet recommended in practice.15
Confirming proper vessel cannulationAlong with detecting direct and indirect signs of vessel cannulation and observing blood returning, it is recommended to have the guidewires shown into the target vessel when used2,7 (Video 7). This practice allows to finally advance the catheter into the target vessel and not in adjacent tissues if it is unintentionally placed in a wrong position. The final position of the catheter should also be directly and indirectly displayed (Video 8).2,7 In peripheral venous cannulation, an agitated saline flush (10ml) passed through the catheter allows to display microbubbles running into the vessel and thus guaranteeing its adequate position and function7 (Video 8). For central venous cannulation, an agitated saline flush is injected through the catheter, normally observing the microbubbles flowing in the right atrium7 within 1–2s16 in simultaneous echocardiographic assessment in subcostal or apical 4-chamber views, performed with a phased-array or a convex probe.
Both dynamic techniques have advantages and disadvantages that must be considered to aid in decision making regarding the selection of the most adequate technique based on the individual characteristics of the vessel and surrounding structures (Table 3). Therefore, practitioners need to have appropriate skills to perform any of them.1
Characteristics of short and long axis (and oblique) real-time US guided vascular cannulation technique.
| Short axis (out of plane) technique | Long axis (in plane) technique | Oblique (in plane) technique | |
|---|---|---|---|
| Vessel shape | Oval (vein) or round (artery) | Tubular | Intermediate between short and long axis |
| Needle | The needle tip is usually not observed. The needle body is in fact shown as an echogenic spot Movement in superficial tissues as well as flattening of the anterior vessel wall | The needle (bevel included) is completely observed as is advanced through the vessel | Equal to long axis technique |
| Advantages | Good delineation of the surrounding structures (e.g. an artery in a vein cannulation) | Good delineation of the needle and its proper depth regarding the posterior wall of the vessel | Both benefits of short and long axis technique |
| Disadvantages | Not directly seen the needle tip, resulting in posterior wall perforations and, for example, pneumothorax in the case of subclavian vein cannulations | Not seen the beside structures at the moment of needle insertion (e.g. arterial puncture in deep vein cannulations) Lobe side artifact, which consists in the needle simulating to enter into the vessel but with no evident blood returning. In fact, the needle is alongside the vessel | Theoretically lower than for short and long axis techniques Lobe side artifact |
| When to select it? | Large vessels When key beside structures are closer to the target vessel and thus a tight control of the needle location is required (e.g. artery besides a target vein) | Smaller vessels (extremely accurate cannulations) When key beside structures are far away from view and to avoid posterior wall perforations when important structures are behind the target vessel (e.g. pleura in axillary vein cannulation) | Especially when is difficult to obtain a strictly longitudinal axis of the vessels When the needle needs to follow a more secure pathway in comparison with the other techniques (e.g. better control of structures beside the target vessel) |
| Learning curve | Shorter | Longer | Probably equal to long axis technique |
| Overall procedure success | Lower | Better | Probably equal to long axis technique |
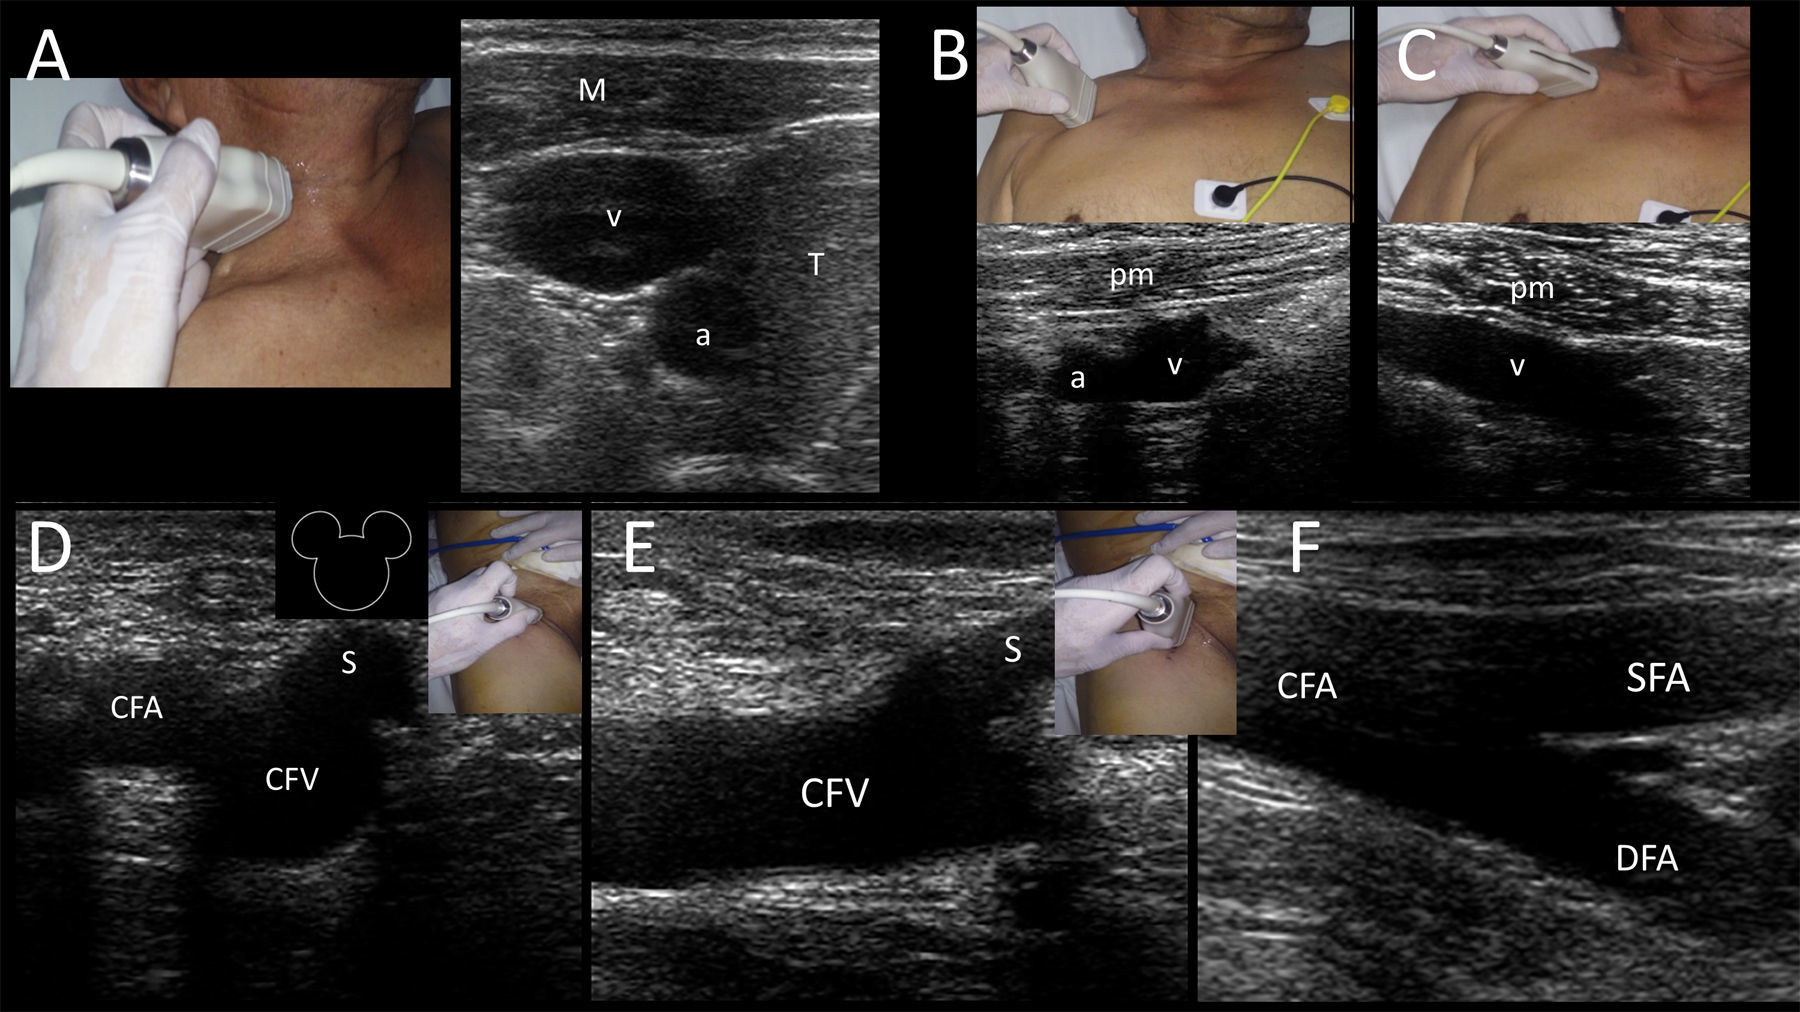
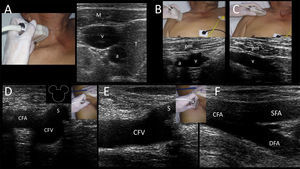
Deep veins providing access to the superior vena cava are the internal jugular vein (IJV, accompanied by the common carotid artery (CCA) in the neck), and the subclavian and axillary veins (accompanied by the corresponding subclavian and axillary arteries). Common femoral vein (CFV) (accompanied by the common femoral artery (CFA) in the groin) provide access to the inferior vena cava.
For IJV and SCV cannulation, dynamic US long axis (in plane) technique has been shown to improve successful cannulation rates, lower the cannulation time, reduce needle redirections and finally decrease the number of posterior wall perforations. All this advantages are associated with a lower number of mechanical complications and thus this approach is more convenient when cannulating these vessels.17
Internal jugular veinIJV is anatomically located in the anterior neck, found anterior to the sternocleidomastoid muscle (ECM) and lateral to the airway in the higher neck and between the clavicular and sternal heads of the SCM (i.e. Sedillot's triangle) in the lower neck. IJV is accompanied by the common carotid artery (CCA) and vagus nerve in the neurovascular bundle. Key US structures when locating the IJV, easily recognized in cross sections, are the infrahyoid muscles, the airway (trachea), the thyroid gland lobes and the CCA (Supplementary material, Fig. 7A). It is worth noting that anatomic variations are reported in the IJV position in relation to the CCA. The ideal position when cannulating the IJV is when this vein is located slightly anterior and lateral to the CCA, found only in 50% of the patients2 (Supplementary material, Fig. 7A) and thus justifying the US-guided cannulation in all patients. US-guidance has demonstrated an 86% reduction in the rate of catheterization failures, an 80% reduction in arterial punctures, a 78% reduction in the number of hematomas, a 90% reduction in the number of pneumothorax cases and a 94% reduction in the rate of hematomas; thus, the risk–benefit ratio and the cost–benefit ratio clearly point toward a strong recommendation to use this technique.18
Both the anterior and posterior approaches (in relation to the ECM muscle) are well performed. The Trendelemburg position improves the venous distention and reduces the risks of air embolism; therefore, is recommended in all patients.2,7 If patient can collaborate, Valsalva maneuver can also enlarge the vein. Mechanical ventilation, rising right atrial pressure, can also distend the IJV. Contralateral head rotation can result in IJV-CCA overlapping, which may result in accidental CCA laceration if the posterior wall of the IJV is inadvertently perforated. Thus, the head must be maintained in a relatively neutral position.2
Subclavian and axillary veinsFrom an anatomical point of view, the subclavian vein is located by definition under the clavicle (i.e. infraclavicular region); the axillary vein is in continuum with the subclavian vein, lateral to the outer border of the first rib at the teres major muscle.7,19
The subclavian vein is accessed from a supraclavicular or an infraclavicular approach (the latter is the most common technique).2,7,20 The main problem when cannulating this vein is the presence of the clavicle bone, which interferes with the probe positioning and fundamentally with the optimal view of this vessel.7,21 In that respect, many practitioners who gain confidence with subclavian vein cannulation move more laterally and puncture the skin at the midclavicular point. This probably means performing skin puncture over the axillary vein but either the subclavian or axillary vein may be punctured depending on the distance between the skin and the vein puncture sites (Supplementary material, Fig. 7B and C).19
Uncertainties related to the utility of the subclavian vein cannulation are likely to be derived from the ambiguity implied by whether studies of US-guided access in this area are referring to direct subclavian vein access or to subclavian vein access via the axillary vein.7,22,23 Despite this, pooled data analysis of US-guided subclavian (or axillary) cannulations showed a 94% reduction in the rate of catheterization failure, an 85% reduction in arterial puncture rates, 77% reduction in the number of hematomas, 78% reduction in the pneumothorax cases and 95% reduction in the number of hemothorax cases.18
As previously mentioned, the long axis (in plane) technique is preferred when cannulating these veins since it is associated with high success rates and fewer complications. The Trendelemburg position does not seem to improve venous distention of this vessel because it is in a relatively fixed position within the surrounding tissues. However, it reduces the risks of air embolism and thus it is always recommended.2
Evaluating the lung sliding before and after cannulating these vessels is recommended, since it allows to quickly detect the presence of pneumothorax.7,16
Common femoral vein (CFV)CFV is anatomically found in the groin (femoral triangle) below the inguinal ligament and medial to the common femoral artery (CFA) and femoral nerve in the neurovascular bundle. CFV is formed by the junction of the deep femoral vein and femoral vein (previously called “superficial femoral vein”) and receives the great saphenous vein (i.e. saphenofemoral junction). While CFV is usually cannulated using the anatomical landmark technique because of the relatively constant location of the vein related to the artery at a safe entry point closer to the inguinal ligament (2–4cm) 24; however, US guidance has demonstrated an 85% reduction in the rate of catheterization failure and an 86% reduction in arterial puncture rates.18 Thus, US-guided femoral cannulation is strongly recommended over the landmark technique18, and can be especially helpful in some circumstances, such as in obese patients, when arterial pulses are weak (e.g. patient is in shock) or when there are anatomical alterations.7 Ultrasonographically, this vein is easily recognized medial to the CFA and receiving the great saphenous vein. In the short axis, these structures are called the “Mickey Mouse” sign (Supplementary material, Fig. 7D). CFV is more distended when the hip has a slightly external rotation as well as in the reverse Trendelemburg position.2 In the long axis, the vein receives the great saphenous vein (Supplementary material, Fig. 7E) and its bifurcation is distal to the CFA bifurcation (Supplementary material, Fig. 7F).
Peripheral veinsPeripheral venous catheters are usually placed using the anatomical landmark technique. However, some patients are difficult or impossible to cannulate, for example, because they are obese, dehydrated, intravenous drug users or have prior multiple vein catheterizations. Therefore, US-guided peripheral venous cannulation can be first considered in this subgroup of patients. Pooled data analysis showed a 20% increase in the rate of successful cannulations and thus it is probably recommended to use US-guided peripheral cannulations first when difficult access to peripheral venous is anticipated in adults.18
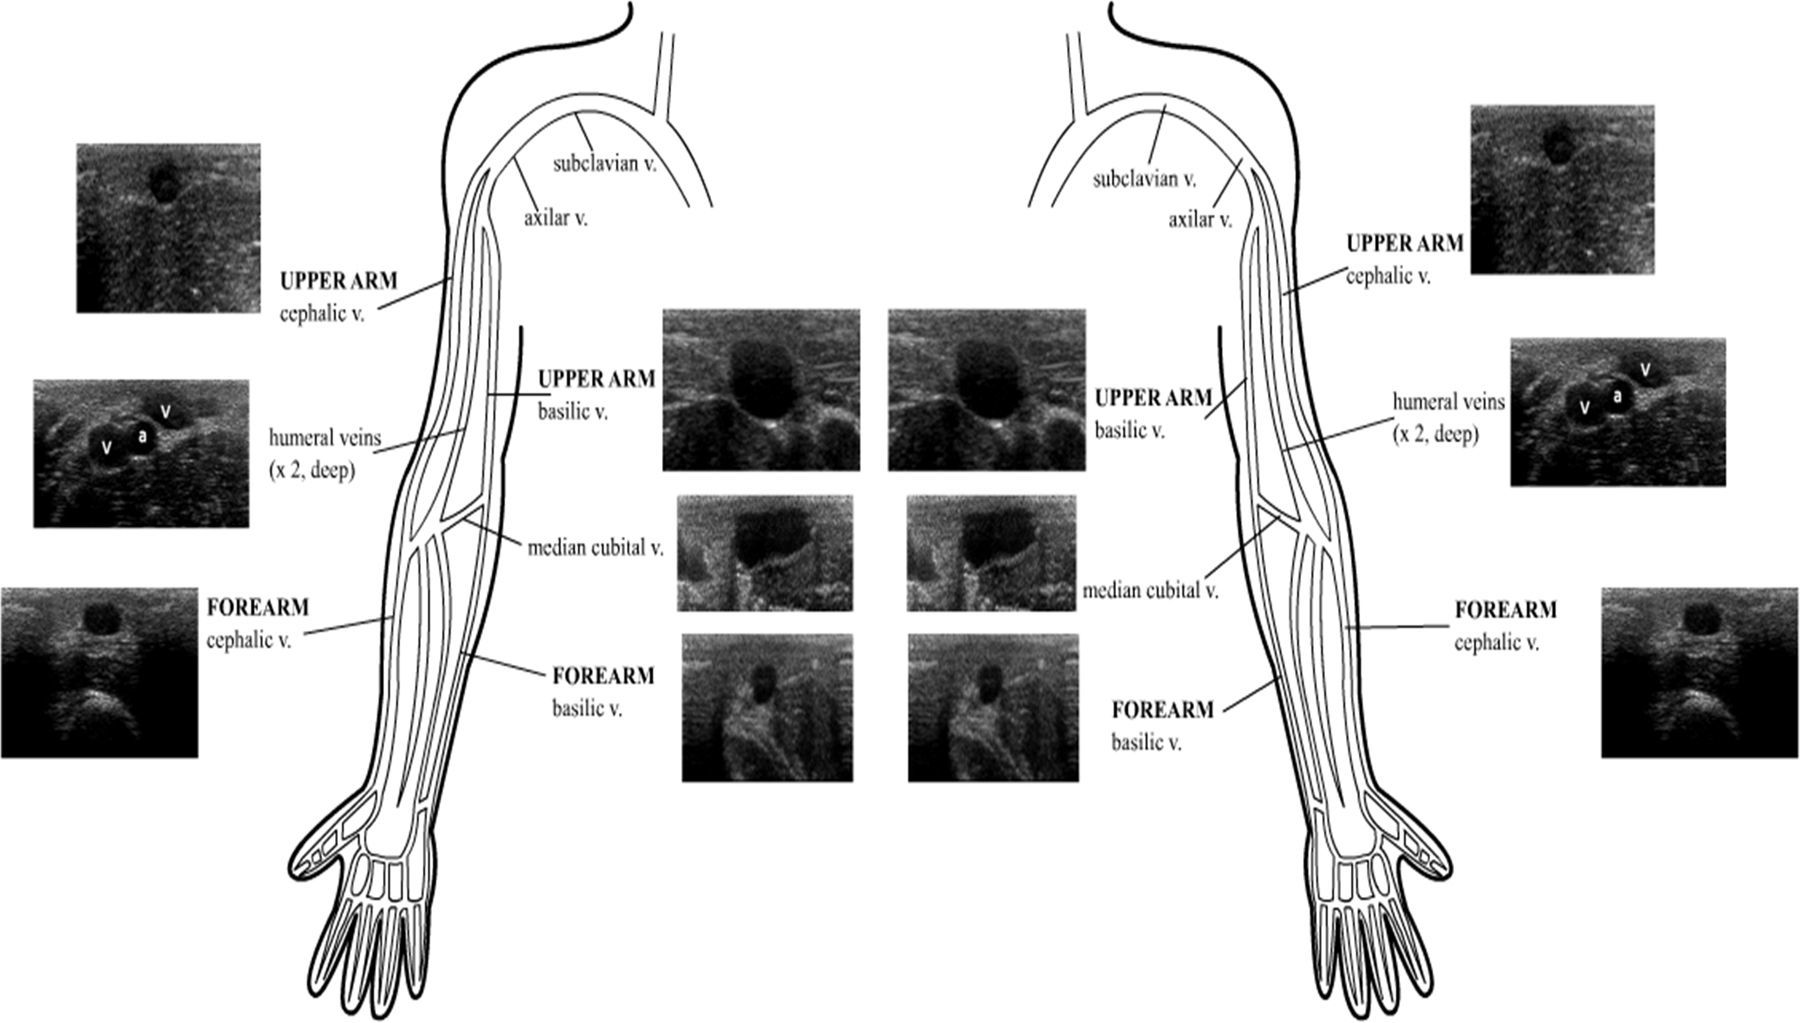
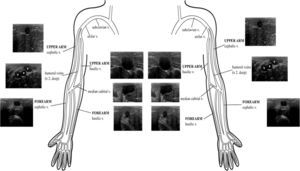
Superficial veins suited for US-guided cannulation are commonly found in the arms. As in the anatomical landmark technique, a proximal tourniquet is applied to observe the peripheral veins, or a pressure cuff is inflated at patient's diastolic pressure. Using US, it was also proved that venous distention is better using the latter technique.6
Two main veins are recognized: a lateral one, located in both the upper arm and the forearm, called the cephalic vein, which finally drains into the axillary vein; and a medial vein, called the basilic vein, which after running in the forearm and reaching the upper arm, it becomes deeper and joins the humeral veins and other tributaries to conform the axillary vein. Tributaries of both main veins are visible as well, including the connection between the cephalic and the basilic vein (median cubital vein) at the elbow crease (Supplementary material, Fig. 8).
Basilic and cephalic veins also provide access to the superior vena cava through placing a peripherally inserted central catheter (PICC).7 PICC lines are placed when long-term intravenous access is needed for antibiotic or chemotherapy administration or in long-term acute care patients in need of intravenous access.2 The use of ultrasound for PICC placement has been shown to substantially increase overall success rates while minimizing the risk of thrombosis, bleeding and catheter-related bloodstream infection.7,25 When using a “blind” approach to PICC line placement, most practitioners rely on a landmark such as an artery to find the adjacent vein (i.e., the brachial artery and adjacent veins in the upper arm). In addition to clarifying the relationship of adjacent arteries and veins, ultrasound can find and guide access to veins that do not travel with arteries (such as the basilic vein), minimizing the risk of arterial puncture.7 Veins with ≥4-mm diameter were considered suitable for 4 Fr catheters, veins with ≥5-mm diameter suitable for 5 Fr catheters and veins with ≥6-mm diameter suitable for 6 Fr catheters.25
Another peripheral vein able to be US-guided cannulated is the external jugular vein in the neck.
Peripheral deep veins for US-guided cannulation are the paired humeral veins, located at both sides of the humeral artery.
Arterial cannulationUS-guided arterial cannulation is particularly helpful in patients that are obese, poorly perfused, have weak pulses (e.g. in shock), altered anatomy or previous failed attempts.7
Arteries able to be US-guided cannulated are the femoral, radial, axillary, humeral and dorsalis pedis arteries. In practice, the most commonly used is the radial artery, since it is superficial and readily accessible, and also because it is not a terminal artery, in contrast with the femoral artery, which is terminal and, so it is usually the second choice.2,7
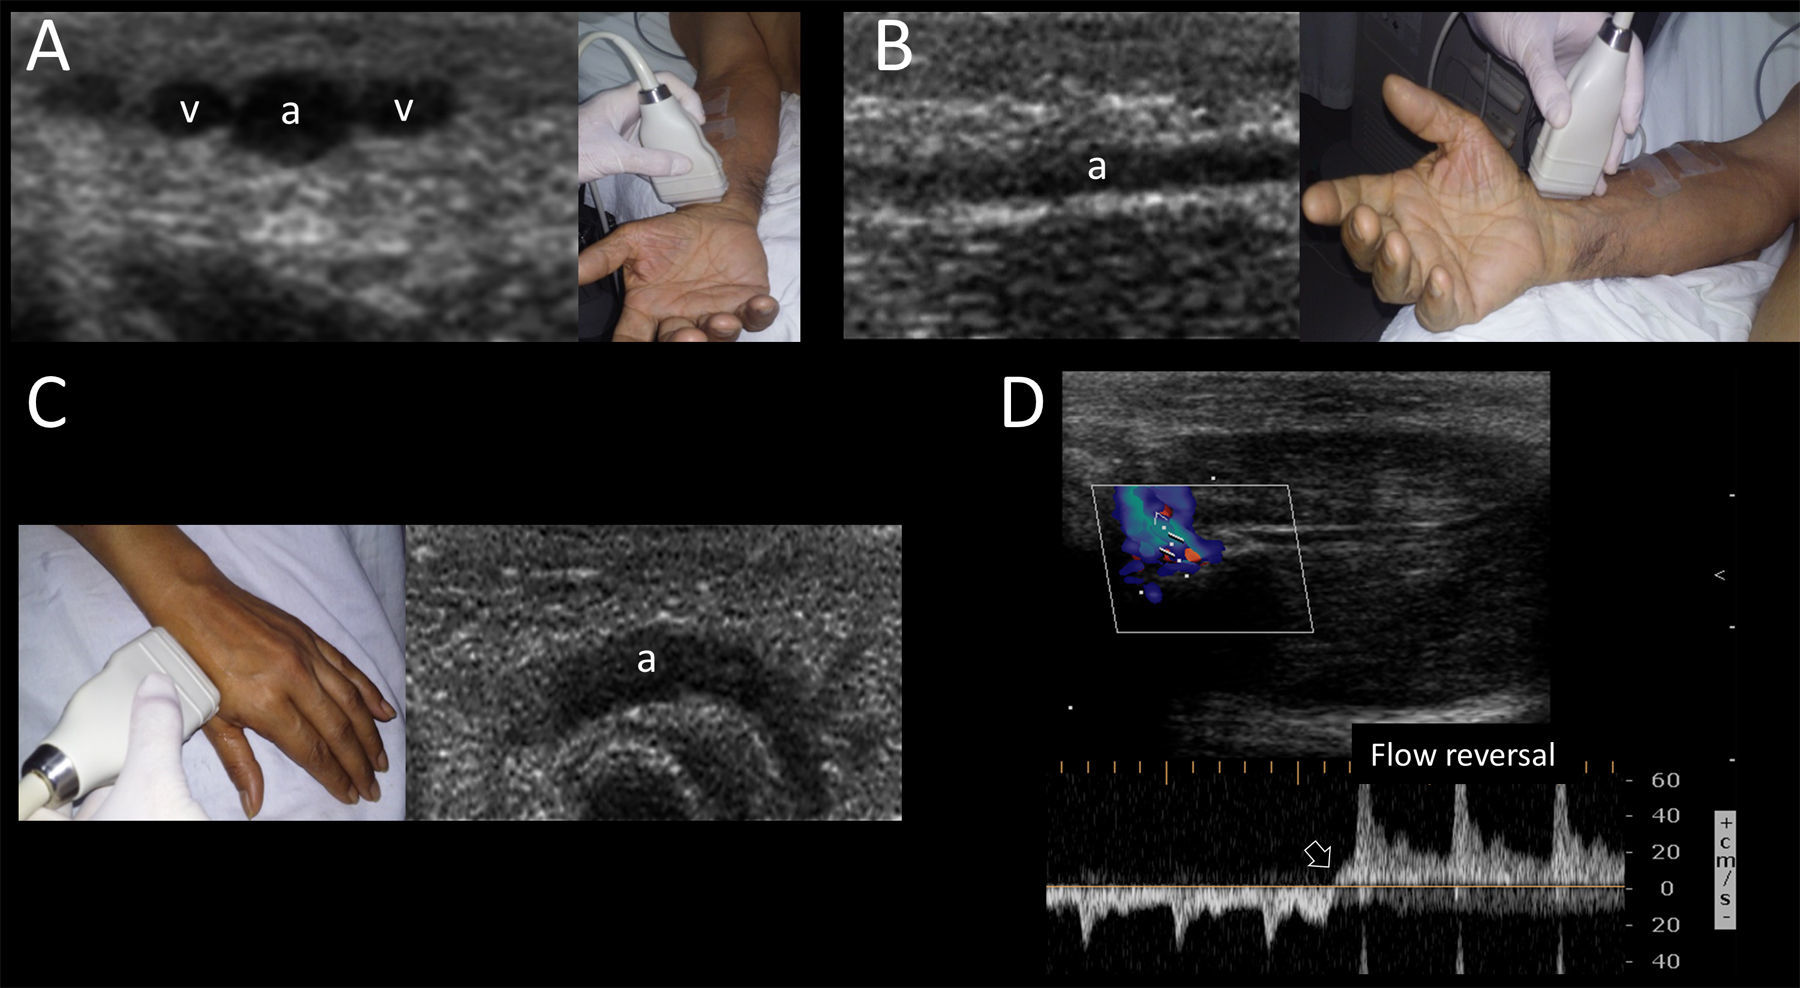
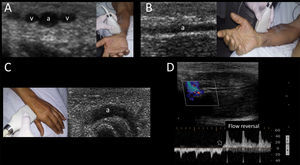
Radial arteryRadial artery emerges from bifurcation of the brachial artery at the elbow crease and is found in the lateral side of the distal forearm near the wrist, where it becomes more superficial and easier to palpate. Accordingly, this artery is usually well recognized by US and accessed from its distal ventral and more superficial segment. This vessel is accompanied by the paired radial veins, located at both sides of the artery (Supplementary material, Fig. 9A and B). Applying a tourniquet distal to the site of cannulation has been shown to improve the arterial dimensions and thus this maneuver can be considered in practice when the artery is too small.26
Additionally, the radial artery can be recognized and cannulated using US in its dorsal segment, found in the anatomical snuffbox (Supplementary material, Fig. 9C). This can be considered as a valid alternative when the more proximal radial artery cannot be accessed.27
Pooled data analysis showed a 36% reduction in the rate of catheterization failure at the first attempt and an 83% reduction in the number of hematomas; however, overall success rate is not reported. Despite this, benefits outweigh risks and thus US-guided radial insertion is probably recommended over the traditional technique.18
The permeability of the palmar arch must be assessed prior to cannulating this artery. This can be performed using the modified Allen test, plethysmographic Allen test28 or modified duplex Allen test.29 The last one is done placing the transducer in the anatomical snuffbox and identifying the radial artery flow by color and spectral Doppler. After spectral waveforms are obtained, the radial artery is compressed proximal to the site of insonation. Normally, reversal of flow confirms patency of the deep palmar arch (Supplementary material, Fig. 9D). Otherwise, an inadequate deep palmar arch is suspected and thus this artery is best avoided for cannulation.
Femoral arteryAs previously described, CFA is located in the femoral triangle, lateral to the CFV and medial to the femoral nerve in the neurovascular bundle. 20% of the patients have a CFA bifurcation above the inferior border of the femoral head. Too high punctures may lead to retroperitoneal hemorrage while punctures below the femoral head may lead to pseudoaneurysm formation. Also, too low punctures may lead to damage to the superficial as well as the deep femoral arteries, an important complication that may lead to significant hemorrhage since these arteries are difficult to compress in thigh soft tissues.30 There is some overlapping between the CFA and CFV in 65% of the patients; therefore, an arteriovenous fistula formation can occur if an inadvertent posterior wall perforation of the CFA occurs.31 In a recent meta-analysis including 719 patients that had US-guided femoral arterial cannulation performed, a 44% reduced overall complication rate was noted in comparison with the landmark technique. Furthermore, a 42% improvement in first-pass success was demonstrated.31 Thus, US-guided cannulation can be recommended as a first line tool to safely place a femoral artery catheter.
Training, acquisition of competences and vascular phantomsTraining in US-guided vascular cannulation is important to improve the rate of successful cannulations and ultimately optimize patient safety. This competence is incorporated into a basic level of training in clinical ultrasound,32,33 consisting in a theoretical as well as a practical basis which is expected to shorten the learning curve of the procedure when applied in training programs.
Part of this training should be accomplished in a simulated environment using “vascular phantoms”, which allow practitioners to skill the simultaneous coordination between the probe and needle manipulation as well as observing the screen, without posing any risks for the patients.21
Among other aspects, an ideal phantom should reproduce the US appearance of human tissues (also called “background echogenicity”) and vessels, replicate the texture and resistance of human soft tissues and finally have different levels of difficulty/complexity that should be easily changed.34,35 Background echogenicity is usually low in commercial phantom models, thus improving needle visibility. However, this is not the case in real practice, where human background echogenicity is higher (mixed echogenicity of muscle, fat, water) and is also combined with the echogenicity of the needle, thus causing some details to be lost. For this reason, homemade animal models, such as chicken breast based phantoms, are the best choice in the author's view to carry out realistic training in this procedure. Vessels are reproduced using modeling balloons, silicone tubes, Pezzer or Penrose catheters, all fully filled with fluids. Several phantom models can be created from superficial small peripheral veins, deep veins, small and large arteries, with practical hands-on sessions and multiple punctures for each model.34,36 In this regard, in a recent US-guided vascular cannulation study performed in a pediatric phantom model created by an avian muscular portion and modeling balloons, 866 US-guided cannulations were simulated, with 74% needle visualization and an overall success rate of 96%. Thus, it appears as a helpful training tool for physicians with varying degrees of expertise in vascular cannulations.36
Although there are no concrete data on the literature, an expert consensus recommends at least 10 fully supervised US-guided vascular cannulations to demonstrate competence to independently perform this technique.2 However, these general recommendations cannot be extrapolated to all US-guided vascular cannulations, since the learning curve is probably higher when cannulating small vessels.
ConclusionsUS-guided vascular cannulation should be considered the tool of first choice to provide access to central venous and arterial vessels, as well as some difficult peripheral venous cannulations in most critically-ill patients, having demonstrated an improved global success cannulation rate and reduced overall complications. US is used “before”, (to define the anatomy and the best target vessel), “during” (with real-time techniques in short, long and oblique approaches), and “after” cannulation (to demonstrate the optimal catheter position as well ruling in or out complications (e.g. pneumothorax)). Optimal training is mandatory, through formal programs and hands-on sessions that imply using “vascular phantoms”; the latter is especially important for practitioners to perform repeated US-guided vascular cannulations without posing risks for patients and ultimately successfully transferring this practice to patients.
Ethical disclosuresProtection of human and animal subjectsThe authors declare that no experiments were performed on humans or animals for this study.
Confidentiality of dataThe authors declare that no patient data appear in this article.
Right to privacy and informed consentThe authors declare that no patient data appear in this article.
Conflict of interestThe author declares no conflict of interest.
The author would like to thank Mrs. Julieta Vigna for the language guidance and especially thanks to Mrs. Vivian Ernst and Carolina Sanchez, Critical care nurses, ICU, Clínica Cruz Azul, for their kind and valuable assistance in preparing the photographs and multimedia material.
The following are the supplementary materials to the article:

